START HERE -----> Inserting RESOURCES for student learning
| Site: | eLearn.MCOE.org |
| Course: | A beginner's guide to eLearn |
| Book: | START HERE -----> Inserting RESOURCES for student learning |
| Printed by: | Guest user |
| Date: | Sunday, June 28, 2026, 6:14 AM |
1. Inserting resources to help students learn
This Moodle Book will show you how to add documents and media to your course and how to turn your Moodle course into an engaging learning experience.
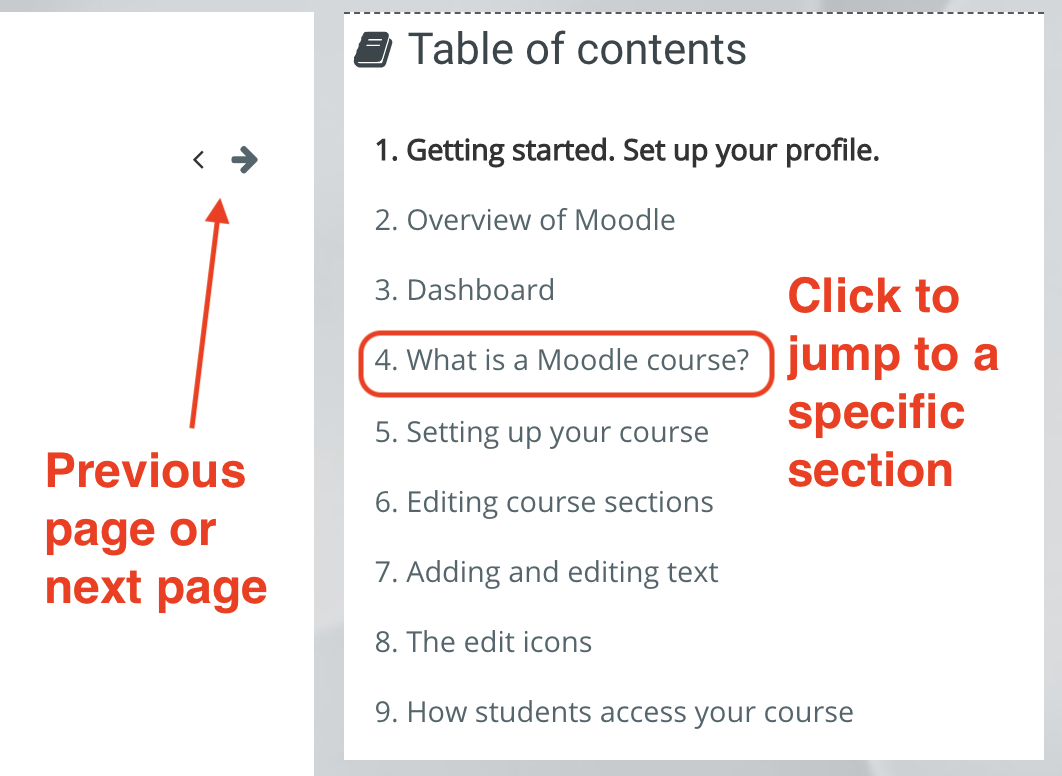
REMEMBER: To navigate through this book, click the left/right arrows to move to the previous or next page. Alternatively, you can click in the Table of Contents to jump to any page in the book.
2. Inserting Pages and Books
While it is very easy to upload course materials such as word-processed documents, it can be more helpful to learners if they are added directly to Moodle as a Page or Book resource. These videos and the text underneath them explain how to do this.
Video tutorials
Page:
Book:
Using a Page or a Book, it does not matter if the teacher's software program is different from the learners', and the learners do not have to download anything to view it.
If you have some basic text information you wish your learners to read, consider using a Page. Our Important dates resource is an example of a Page. You can also embed images or media files. If you have a series of pages you wish them to read, consider using a Book. There are several Books in this course and the text you are reading now is in one of them.
Documentation links:
(These Moodle documentation links open in a new window.)
3. Linking versus Embedding
Many teachers like to use Moodle to display class notes, lecture presentations, revision sheets and other documents. This is very useful although Moodle can do much more than just show your files and folders. We saw in Week 1 how to drag and drop documents straight onto your course page. Now we explore a second method, if you are unable to use drag and drop.
Video tutorial
You need to turn editing on from the link in the gear menu top right.
Documentation links:
(These Moodle documentation links open in a new window.)
4. Inserting images
If you have a lot of content on your course, adding a small images or banners can make it more attractive. This video and the text underneath it explain how to do this.
Video tutorial
Make sure you own the images or they are Creative Commons or in the Public domain before you upload them however. It is also helpful to have them at the size you want before you display them on Moodle.
Images can be uploaded either by dragging and dropping if your browser and admin settings allow it or by clicking the image icon (like a mountain) in the text editor. Both methods need you to have the editing turned on. If you don't see a message saying you can drag and drop, you need to add images using the image icon.
Documentation links:
(These Moodle documentation links open in a new window.)
5. Inserting a YouTube video into a page
It is likely you will be using YouTube videos to do at least a portion of your instruction. Here is how to embed YouTube videos into a Moodle page:
6. Inserting sound and video files
Moodle's text editor makes it easy to embed (display inline) media files such as mp3 recordings, movies you have created in class or from YouTube. This video and the text underneath it explain how.
Documentation links:
(This Moodle documentation link opens in a new window.)
7. Inserting URLs to access other websites
This video and the text underneath it show you how to display useful websites to your learners.
Video tutorial
There are many sites out there which could help our learners. There are also many online files they could usefully access. The URL resource allows teachers to make a direct link to a site or online file. This saves your class time searching and ensure they stay on task.